

Note: There are several ways to disable the automatic updates on Windows 10, or to specify the procedure of these downloads and installations manually. It's recommended to use the Group Policy method. However, since Windows 10 Home doesn't have the Group Policy Editor, this guide also explains the method using the Windows Registry.
This tutorial was last checked and updated on March 6, 2022.
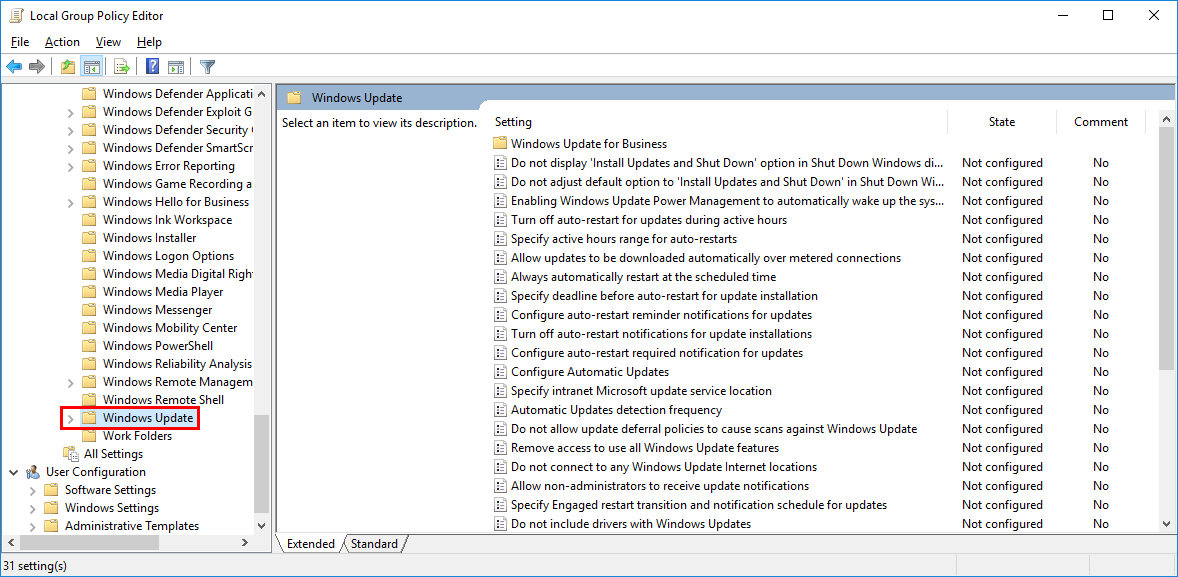
Method 1: Group Policy
Navigate to "Computer Configuration" -> "Administrative Templates" -> "Windows Components" -> "Windows Update" on the left.
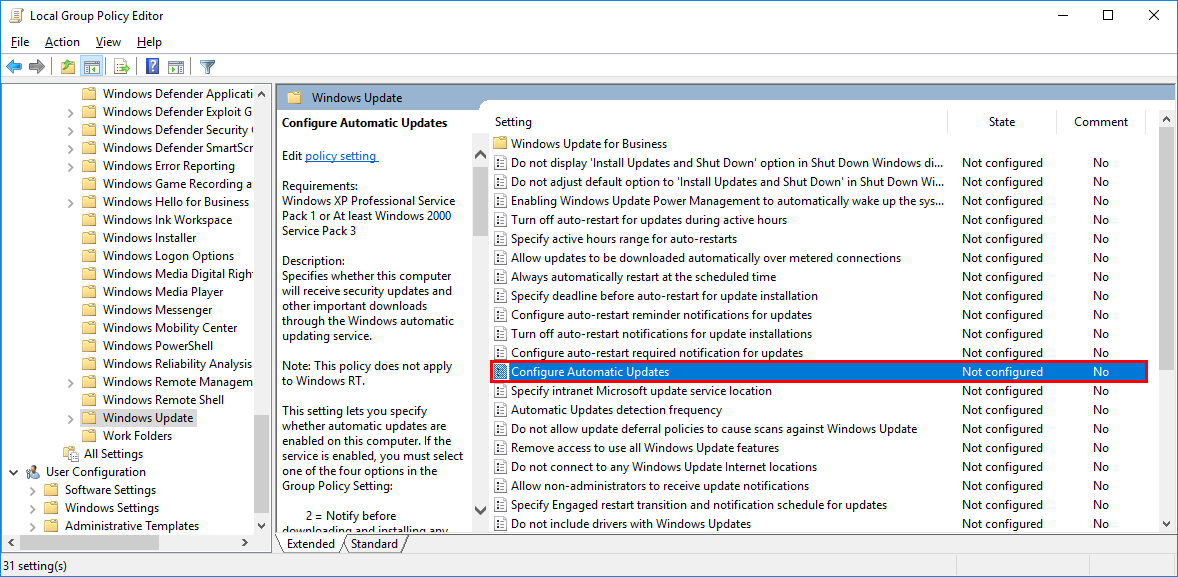
In the right side of the window, double-click "Configure Automatic Updates". Another window will now open.
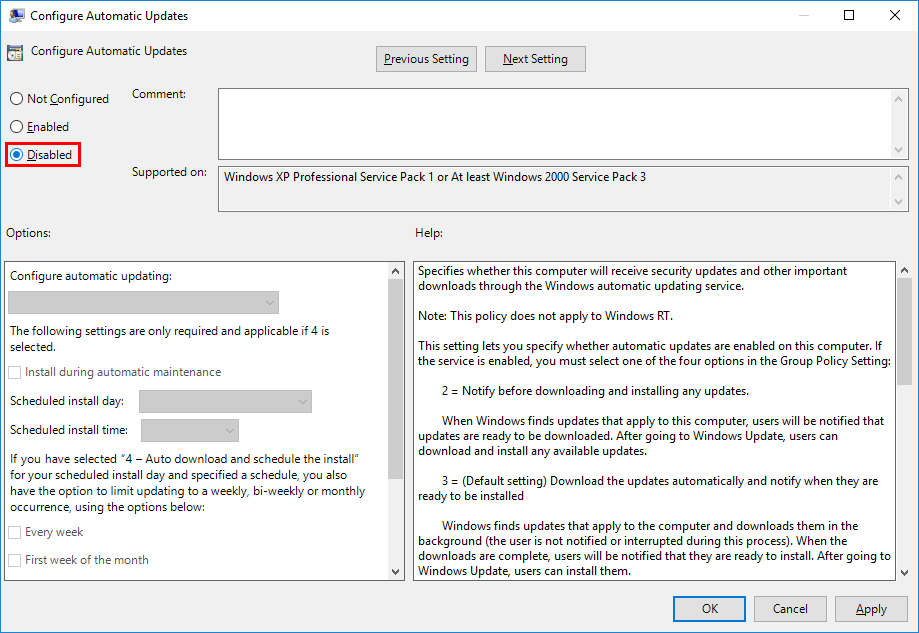
To disable automatic updates completely, set this policy to "Disabled" in the top left corner of this window.
If you just want to specify how the automatic updates should be downloaded and installed, then follow these steps:
Set this policy to "Enabled" in the top left corner.
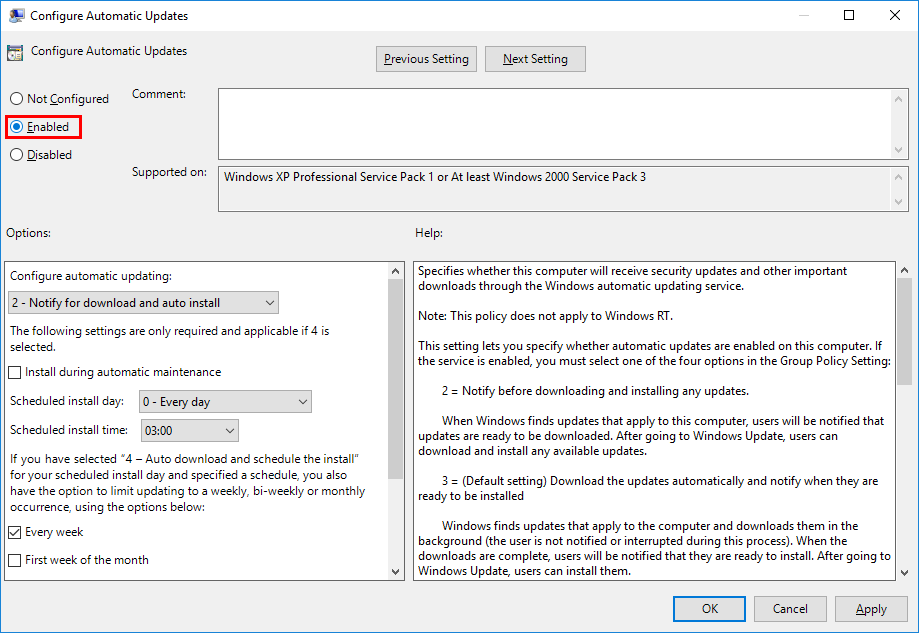
Now you can use the dropdown "Configure automatic updates" to specify how Windows should download and install automatic updates. You can choose between the following options:
"2 - Notify for download and auto install"
"3 - Auto download and notify for install"
"4 - Auto download and schedule the install"
"5 - Allow local admin to choose setting"If you, for example, select "2 - Notify for download and auto install", then Windows will still automatically search for updates in the background, but these are neither downloaded nor installed. Instead, you will receive a notification as new updates become available. Then you can download and install them whenever you want.
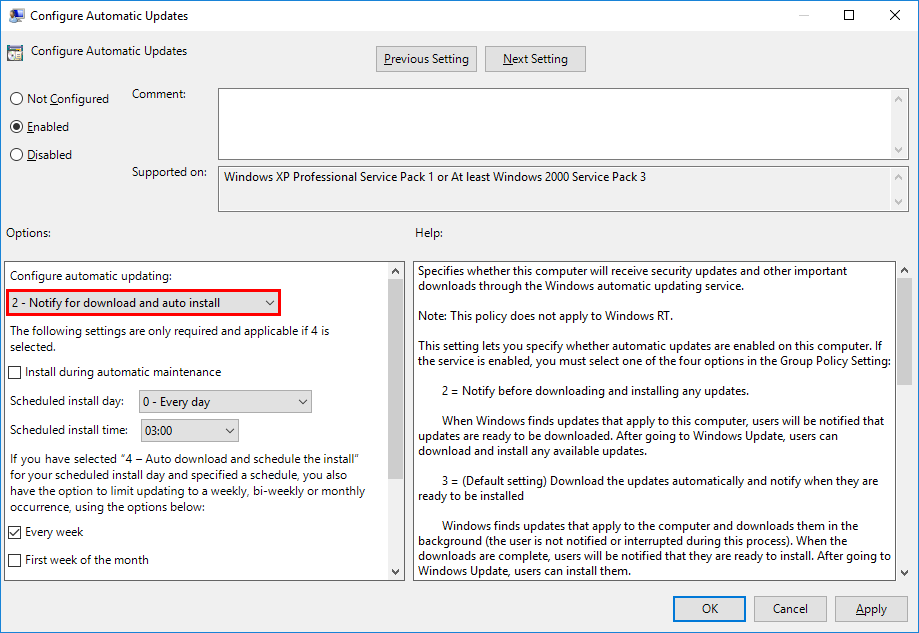
After selecting your desired option, click on "Apply" and then click "OK". You can now close the Group Policy Editor.
Method 2: Windows Registry
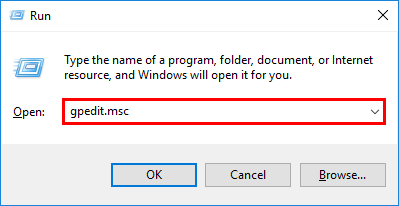
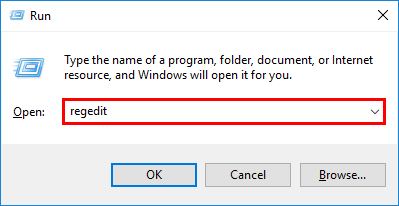
Press Windows Key + R and type regedit in the text box of the "Run" window, which has just opened. Then press Enter.
Navigate to "HKEY_LOCAL_MACHINE\SOFTWARE\Policies\Microsoft\Windows" on the left side of the Registry Editor window.
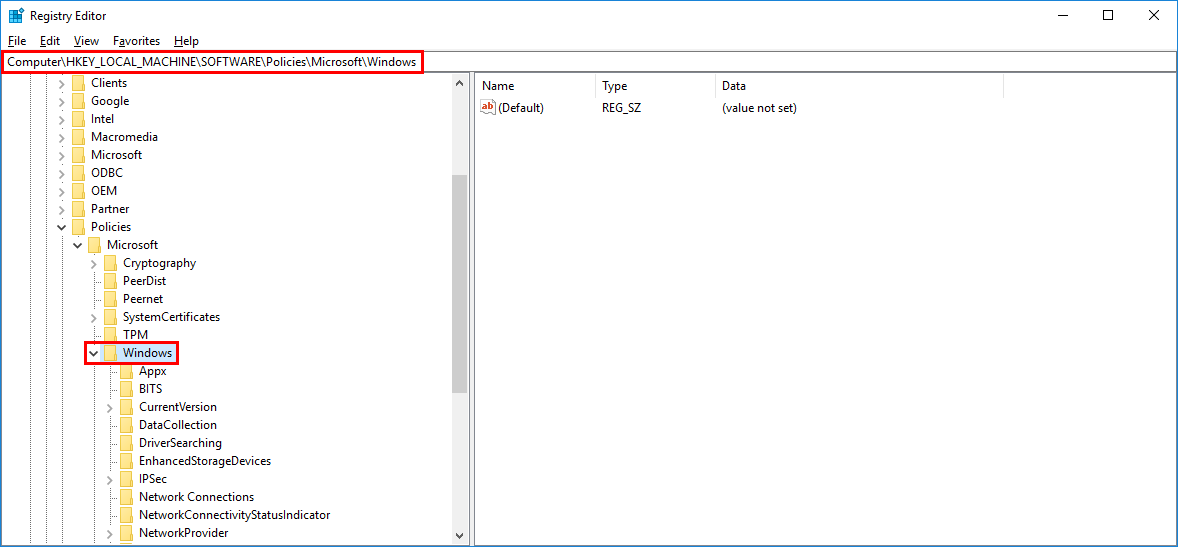
If the key "WindowsUpdate" doesn't already exist inside the "Windows" key, right-click on "Windows " and select "New "->" Key". Name this new key "WindowsUpdate" and press Enter.
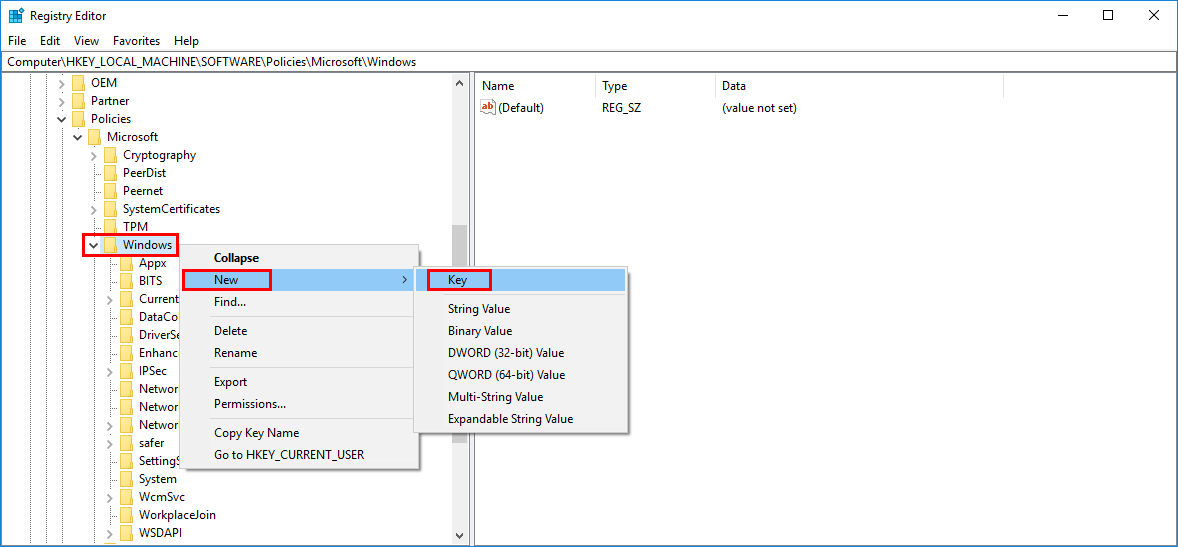
Create a key called "AU" within the "WindowsUpdate" key in the same way.
If you want to disable the automatic updates completely, follow these steps:
Right-click on the newly created key "AU" and click on "New" -> "DWORD (32-bit) Value" to create a DWORD value named "NoAutoUpdate".
If you want to disable the automatic updates completely, follow these steps:
Right-click on the newly created key "AU" and click on "New" -> "DWORD (32-bit) Value" to create a DWORD value named "NoAutoUpdate".
Next, double click this DWORD value and change it's value data to 1.

Finally, confirm your changes by clicking on "OK". You can now close the Registry Editor.
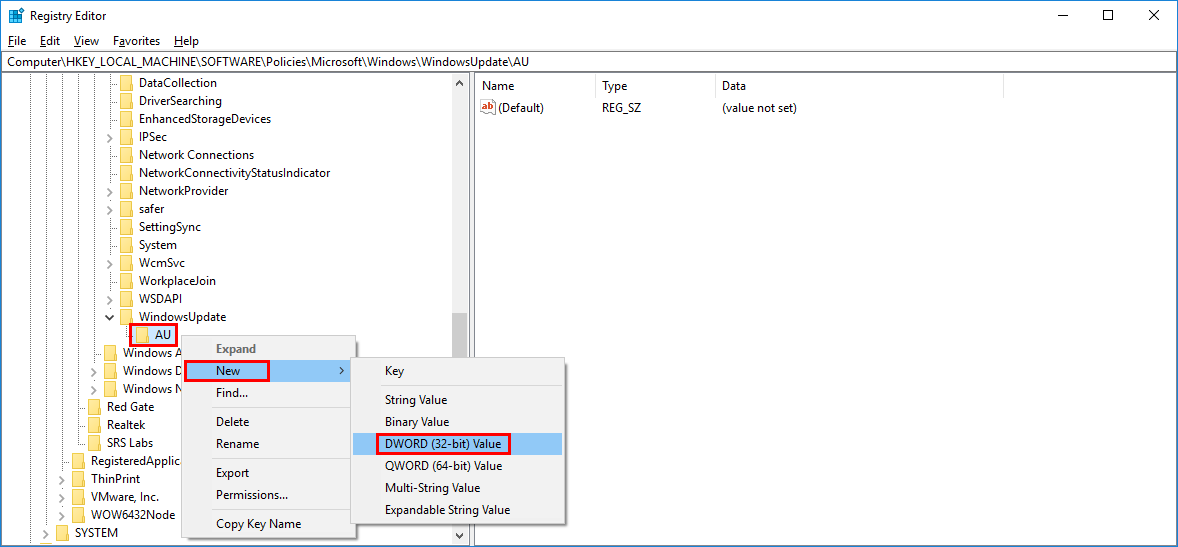
If you want to specify how the automatic updates should be downloaded and installed (as in method 1), follow the steps below:
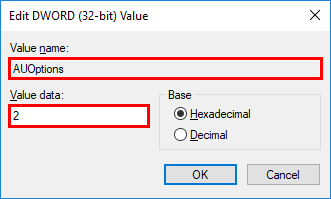
Right-click on the newly created key "AU" and click on "New" -> "DWORD (32-bit) Value" to create a DWORD value named "AUOptions".
Now double click this DWORD value and change it's value data to one of the following numbers (depending on the desired setting):
2: Notify for download and auto install
3: Auto download and notify for install
4: Auto download and schedule the install
5: Allow local admin to choose setting
2: Notify for download and auto install
3: Auto download and notify for install
4: Auto download and schedule the install
5: Allow local admin to choose setting
Finally, confirm your changes by clicking on "OK". You can now close the Registry Editor.
Original Post / Post Credit : https://www.bennetrichter.de/en/tutorials/windows-10-disable-automatic-updates/
Disclaimer : This post belongs to another website (bennetrichter.de). All rights and credit goes to author/Website (bennetrichter.de). If you/author want to remove this post from this website please mail me at [email protected]. I repost only for education purpose.

![[2019] [UPDATE] KineMaster Pro Mod Apk *Full Unlock* *No Watermark* [Direct Download Link]](https://blogger.googleusercontent.com/img/b/R29vZ2xl/AVvXsEhrt0JKb2HYVKFc3pPyqwkTdTSMwprGUTYbHSldL_eyX_SgcQgf4iS9Z_Y-iIOEJp2TebqgmdEXCTwYP2F3LMELdC2kyp-LRO4b1l50RnGbvplAko-xnaGrLsOotLBbGDQeKpzITLKbxvk/s72-c/Capture.JPG)


No comments:
Post a Comment