Whether you're managing computers in a classroom, an office environment, or just trying to keep your personal settings consistent on a shared family PC, preventing unauthorized visual changes in Windows is a common need. Unwanted theme or screensaver changes can disrupt workflow, waste time, or simply mess up your preferred aesthetic.
Fortunately, Windows offers powerful administrative tools like the Local Group Policy Editor and the Registry Editor to lock down these customization options.
🚨 Disclaimer: Modifying the Windows Registry incorrectly can cause system instability. Always back up your registry before making changes. The Local Group Policy Editor is available in Windows Pro, Enterprise, and Education editions, but not in Windows Home.
1. Prevent Desktop Background (Wallpaper) Changes, Screensaver Changes, 🖼️
The easiest way to prevent a desktop background change is to both prevent the setting from being changed and, optionally, enforce a specific wallpaper.
Using Local Group Policy Editor (gpedit.msc)
- Open the Run dialog (Windows Key + R), type gpedit.msc, and press Enter.
- Navigate to:
User Configuration → Administrative Templates → Control Panel → Personalization. - Double-click Prevent changing color scheme.
- Set the policy to Enabled.
- Click Apply and OK.
- Double-click Prevent changing Theme.
- Set the policy to Enabled.
- Click Apply and OK.
- Double-click Prevent changing vitual style for windows and buttons.
- Set the policy to Enabled.
- Click Apply and OK.
- Double-click Prohibit Selection of vitual front style.
- Set the policy to Enabled.
- Click Apply and OK.
- Double-click Prevent changing color and appearance.
- Set the policy to Enabled.
- Click Apply and OK.
- Double-click Prevent changing desktop background.
- Set the policy to Enabled.
- Click Apply and OK.
- Double-click Prevent changing desktop icon.
- Set the policy to Enabled.
- Click Apply and OK.
- Double-click Prevent changing mouse pointers.
- Set the policy to Enabled.
- Click Apply and OK.
- Double-click Prevent changing screen saver.
- Set the policy to Enabled.
- Click Apply and OK.
- Double-click Prevent changing sounds.
- Set the policy to Enabled.
- Click Apply and OK.
Screenshot
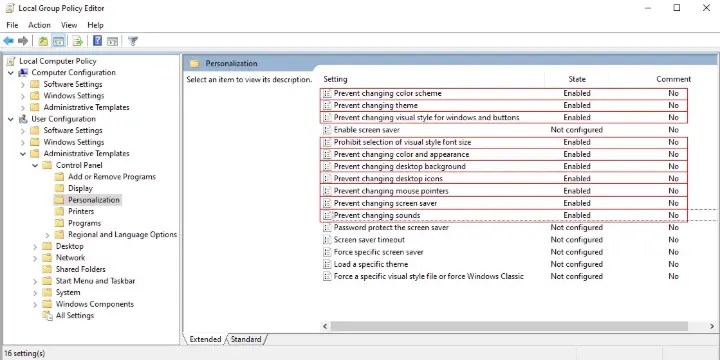
This will grey out the background options in Settings, displaying a "Some settings are managed by your organization" message.
To enforce a specific image (and further lock down the setting):
- Navigate to:
User Configuration → Administrative Templates → Desktop → Desktop. - Double-click Desktop Wallpaper.
- Set the policy to Enabled.
- In the Wallpaper Name field, enter the full path to your desired wallpaper image (must be a .jpg or .bmp file). If it's a shared path, use the UNC path (e.g., \\ServerName\ShareName\wallpaper.jpg).
- Select a Wallpaper Style (e.g., Fill).
- Click Apply and OK.
Using Registry Editor (Windows Home or a simpler lock)
- Open the Run dialog (Windows Key + R), type regedit, and press Enter.
- Navigate to:
HKEY_CURRENT_USER\Software\Microsoft\Windows\CurrentVersion\Policies - If the Control Panel key doesn't exist under Policies, right-click on Policies, choose New Key, and name it Control Panel.
- Right-click on the Control Panel key, choose New → Key, and name it Desktop.
- Select the Desktop key. In the right pane, right-click and choose New → DWORD (32-bit) Value.
- Name the new value NoDispScrSavPage.
- Double-click NoDispScrSavPage and change its Value data from 0 to 1.
- Click OK.
Setting this value to 1 will hide the Screensaver settings page, effectively preventing changes.
Applying Changes and Final Steps
For all the Group Policy changes above to take immediate effect, you should force an update:
- Open the Run dialog (Windows Key + R), type cmd, and press Enter.
- In the Command Prompt, type gpupdate /force and press Enter.
For Registry Editor changes, simply restarting the computer or logging out and logging back in is usually sufficient to apply the new settings.
By implementing these restrictions, you can maintain control over the Windows desktop experience, ensuring consistency and compliance across multiple users or simply preserving your preferred settings.